C#
Better C# Switch Statements for a Range of Values
By hackajob Staff
Flask is one of the most popular web frameworks for Python. A key contrast between Flask and Django (the other framework) is that the latter comes with several out-of-the-box tools that make configuration much quicker. This is because Django takes a ‘batteries-included’ methodology, meaning it facilitates the achievement of common web development tasks without the need to use third-party libraries.
As an example, Django comes with its own Object-Relational Mapping (ORM), however this isn’t to say that Flask doesn’t have its own advantages. As a starting argument, Flask allows developers to use most of the key features offered within Python.
Whatever your argument for the scalability debate, you’re more than likely to find yourself at one point in your career working with Flask if you are a Python developer. Below, we’ve created a short guide on how you can deploy a Flask API, use SQLAlchemy as an ORM (with a PostgreSQL database) and Alembic for the migrations.
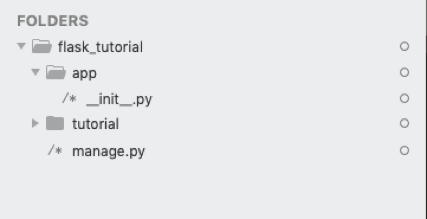
Start by creating a folder in your local machine, as well as a virtual environment inside that folder. Check out the examples below for inspiration:


In the first step, we created a virtual environment called ‘tutorial’ inside the folder titled ‘flask_tutorial’. In the second step, the virtual environment has been activated.
Once you've completed the above steps, go ahead and install the following:
Flask-Restful
SQLAlchemy
Flask-Migrate
Alembic
Psycopq2
Note that you can install them all in one command like so:
pip install flask flask-restful flask-sqlalchemy flask-migrate alembic psycopg2
Unlike Django, Flask doesn’t offer a boilerplate so you will have to create your own, but there are a few best practise tips that can help other developers understand your code both better and faster.
Create a folder called ‘app’ - this is where your application will live. Inside that folder, make a file called ‘__init__.py’. This will help Python recognise this folder as a module. Remember that this folder will also contain code for creating your application. In the main folder (outside of the app folder) establish another folder called either ‘manage.py’ or ‘run.py’. This file will be the entry point for your entire application, so your folder structure should look like so:
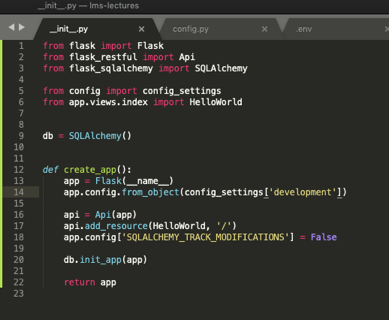
It’s now time to create your app inside the ‘__init__.py’ file you made previously, so use the example below for inspiration:
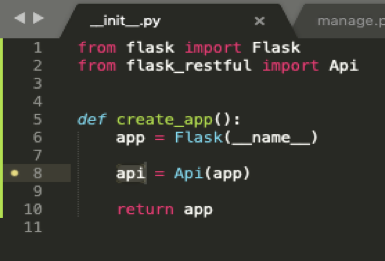
Note that the method ‘create_app’ is where your application will be initialised (as seen in line 6). In line 8, you’re creating the API for the app using Flask Restful.
Remember that the file ‘manage.py’ in the root folder is the entry point for the entire application, therefore you’ll need to connect your ‘create_app’ method to this file like so:
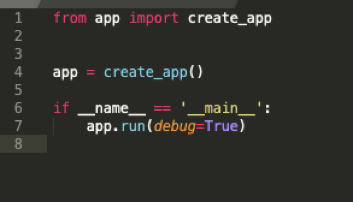
Take note that in line 7, our example shows the argument ‘debug’ set to ‘True’ for development purposes, however this can be changed in other environments.
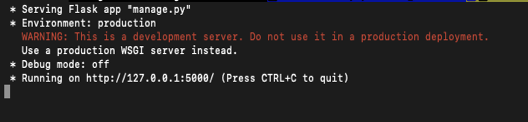
Now go to your terminal and try running the application server:

Start by running these two commands in the terminal. After the second command, the server should start running as shown below:
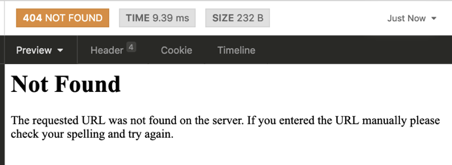
Now your API is up and running, but there isn’t a custom endpoint and if you try accessing the URL above, you’ll be given the following error:
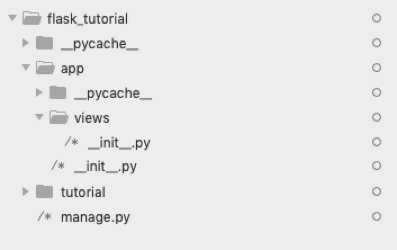
With this in mind, it’s time to create an endpoint, specifically one that displays the text ‘Hello World’ when you access it. Make a folder titled ‘views’ inside the overall app folder, and then establish a folder titled ‘__init__.py’ inside of the ‘views’ folder in order to allow it to be accessed as a module.
Next, make a folder called ‘index.py’ (or any other name of your choosing) inside of the views folder. This is where you’ll create your endpoint, so make sure to use the example below for reference:
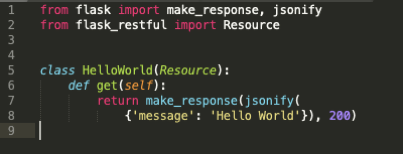
Note that the class ‘Hello World’ isn’t just a normal Python class because it inherits from Flask’s RESTful Resource. Flask’s ‘make_reponse’ also ensures that the returned object is a response. Remember that you can add any additional headers such as ‘status code 200’.
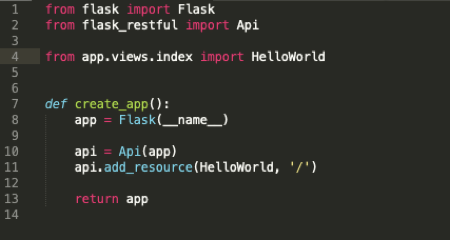
You’ll need to add the ‘Hello World’ resource to the API within your app’s ‘_init_.py’ file:
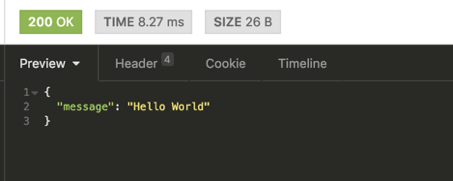
Now try accessing the base URL. You should get the following:
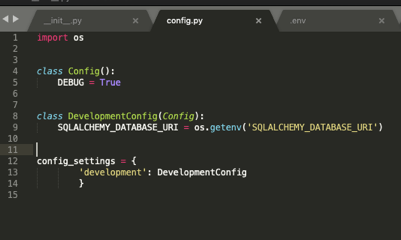
From there, connect your application to a database to ensure that data is stored efficiently from post methods. To do this, simply create a postgres database locally and export it within your ‘.env’ file. Next, create a database session for ‘NB’ (this session is an instance of ‘SQLAlchemy’). Additionally, make a ‘config.py’ file that’ll hold the app configurations as shown below:
You’ll now want to create the database session and add it to your app:
Note that in line 20, the session is initiated every time the app is either created or runs.
Recapping on this tutorial so far, you should have:
1. Created a flask app
2. Deployed the app as a REST API
3. Created an endpoint that shows `Hello World` when you hit it.
4. Added a database session to our app
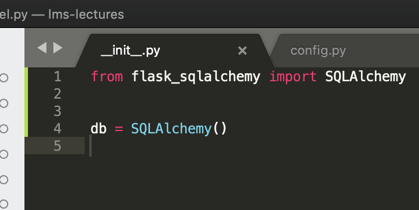
For the final stage, you’re going to be looking at how the ORM (SQLAlchemy) works to create tables in the database from your models. Make a folder called ‘models’ inside of your app folder. From there, you’ll need to establish a file titled ‘_init_.py’ inside the modals folder. Take note of the next steps, because you’re going to transfer the db session creation code to the new ‘_init_.py’ file. You’ll need to do this to avoid circular imports in your application, because you’ll want the session in the models.
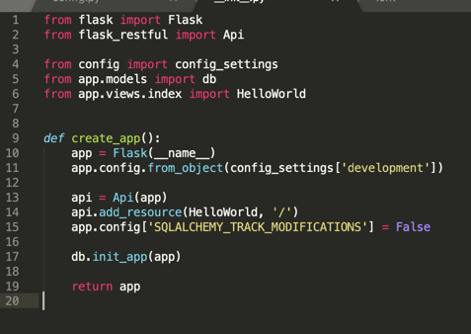
Just to reiterate, your ‘create_app’ function should not look like the example below:
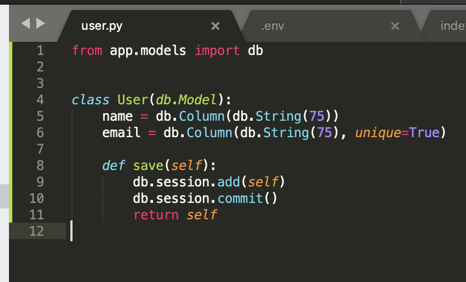
Now, create a simple model class called ‘User’. Make a file called ‘user.py’ in the models folder, just like the example below:
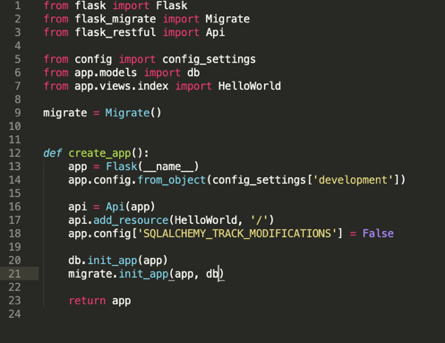
If you want this table to made in the database you previously created, you’ll need to use ‘Flask-Migrate’ which uses Alembic. Add this to your ‘create_app’ method, using the below example for reference and taking note of lines 9 and 21.
Create a migration repository by running the following command in the terminal: ‘flask db init’. To make migration files, simply run ‘flask db migrate’ and to create the tables in the database, run ‘flask db upgrade’.
By the time you’ve made it to the end of this tutorial, you should be able to comfortably deploy a Flask app and create tables from your models using an ORM.
Found this article a breeze? Make sure to reach out to us on Twitter and let us know what you’d like to see next time. Alternatively, make sure to visit our website and give our other tech tutorials a try.